 Save to Pinterest
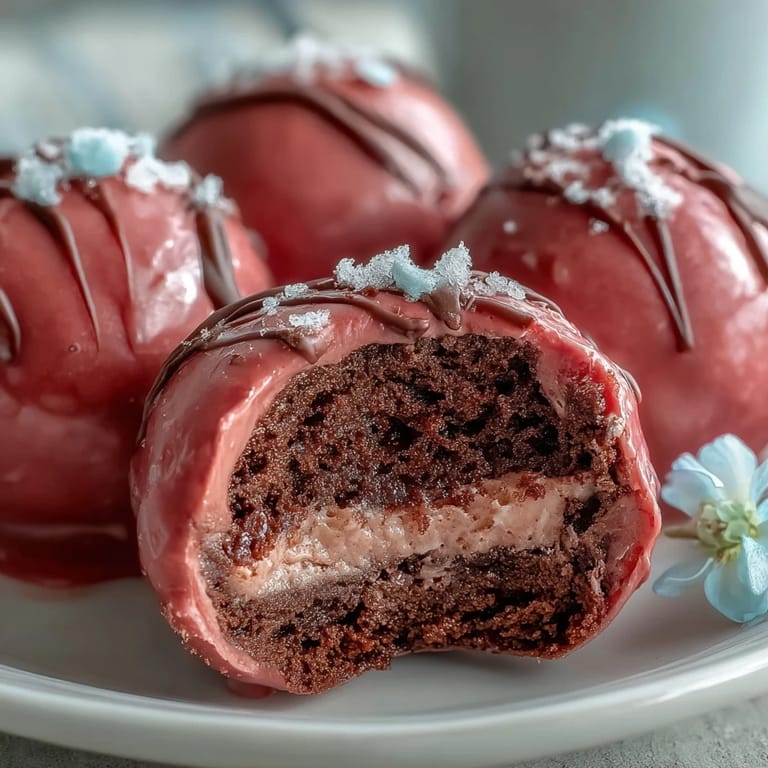
 My sister's baby shower was in three days, and I'd promised homemade treats without thinking it through. I needed something that looked impressive but didn't require actual baking skills. A friend mentioned Oreo truffles, and I laughed—cookies mixed with cream cheese, dipped in pink candy? It sounded too easy to be good. But the moment I rolled that first ball and watched the candy coating harden into a glossy shell, I knew I'd stumbled onto something genius.
I brought a platter of these to the shower, and people kept asking which bakery I'd ordered from. My sister bit into one, closed her eyes, and said it tasted like the fancy truffles we used to get at the mall, except better. I didn't tell anyone how simple they were until someone spotted Oreo crumbs on my sweater. The secret was out, but by then, half the tray was gone and three guests had already asked for the recipe.
Ingredients
- Oreo cookies: Use the whole cookie, filling and all, for that signature cookies and cream flavor that binds beautifully with the cream cheese.
- Cream cheese: Room temperature is key so it blends smoothly without clumps, creating a truffle base that holds its shape when rolled.
- Pink candy melts: These melt into a glossy, snappy coating that sets firm at room temperature and gives you that professional bakery finish.
- Vegetable shortening: Just a teaspoon thins the candy melts slightly, making dipping easier and the coating silkier.
- Sprinkles or edible pearls: A little sparkle on top turns these from homemade to party-ready in seconds.
Tired of Takeout? 🥡
Get 10 meals you can make faster than delivery arrives. Seriously.
One email. No spam. Unsubscribe anytime.
Instructions
- Crush the cookies:
- Pulse the Oreos in a food processor until they become fine, dark crumbs with no big chunks left. If you don't have a processor, seal them in a zip-top bag and roll over them with a rolling pin until they're sandy.
- Mix the truffle base:
- Dump the crumbs into a bowl, add the softened cream cheese, and stir with a spatula until the mixture is smooth and uniform, like thick cookie dough. It should hold together when pressed.
- Shape the truffles:
- Scoop out tablespoon-sized portions and roll them between your palms into firm, round balls. Line them up on a parchment-covered baking sheet as you go.
- Chill until firm:
- Pop the tray into the refrigerator for 30 minutes, or the freezer for 15, until the truffles feel solid enough to dip without falling apart. This step is non-negotiable.
- Melt the candy coating:
- Microwave the pink candy melts in 30-second bursts at medium power, stirring between each round until smooth and glossy. Stir in the shortening if you want an even thinner, shinier coating.
- Dip each truffle:
- Use a fork to lower each chilled ball into the melted candy, roll it gently to coat, then lift and tap the fork on the bowl's edge to shake off excess. Slide it back onto the parchment.
- Decorate while wet:
- Sprinkle on your toppings immediately, before the coating sets. Work quickly, or the candy will harden and decorations won't stick.
- Let the coating set:
- Leave the truffles at room temperature until the candy shell is firm and no longer tacky, or chill them for 10 to 15 minutes if you're in a rush. Once set, they're ready to serve.
 Save to Pinterest
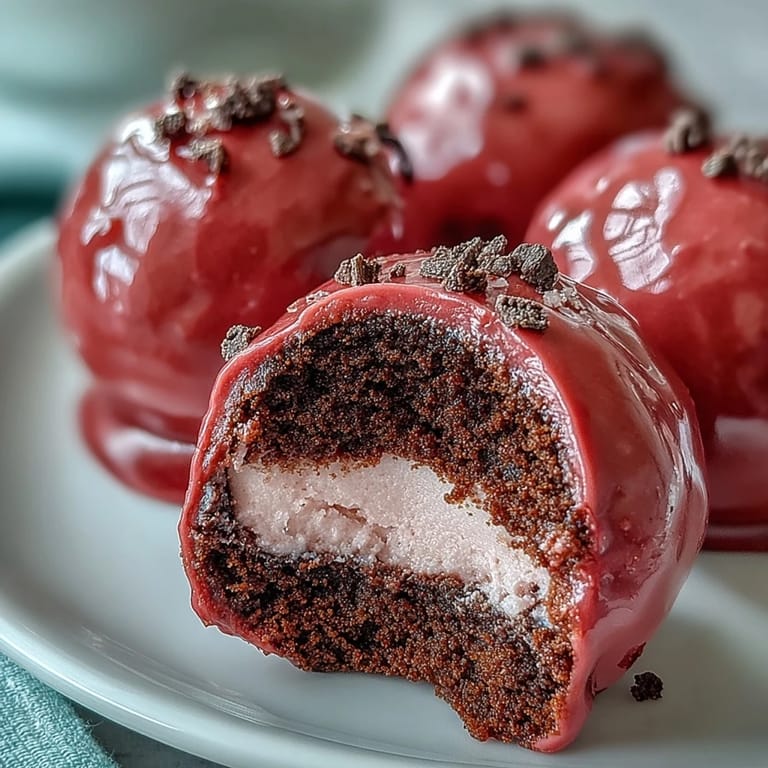
 A week after the shower, my sister texted me a photo of her toddler with pink candy melt smeared across his cheeks. She'd hidden the last few truffles in the back of the fridge, but he found them anyway. I laughed, because that's exactly what these are—impossible to resist, no matter your age. They've become my go-to whenever I need something sweet, simple, and guaranteed to disappear.
Choosing Your Coating Color
Pink is classic for showers and Valentine's Day, but I've made these in every color imaginable. Red and green for Christmas, pastel yellow for Easter, even black and orange for Halloween. Oil-based food coloring works best if you're tinting white candy melts yourself, because water-based dyes will ruin the texture. I keep a few bottles on hand and mix custom shades depending on the occasion.
Storing and Serving
These truffles stay fresh in an airtight container in the fridge for up to a week, though they never last that long at my house. I like serving them straight from the cold—the coating stays snappy, and the center is firm but creamy. If you're packing them for a gift or party, layer them between sheets of parchment so the coating doesn't stick or smudge.
Customizing Your Truffles
Once you've mastered the basic version, it's hard not to experiment. I've stirred crushed peppermint into the truffle base for a holiday twist, folded in shredded coconut for texture, and even swapped regular Oreos for the peanut butter-filled kind. Each variation brought something new, but the method stayed the same—mix, roll, chill, dip.
- Try golden Oreos with white candy melts for a lighter, vanilla-forward version.
- Add a pinch of espresso powder to the cream cheese mixture for a subtle mocha note.
- Drizzle contrasting candy melt colors over the set coating for a bakery-style finish.
 Save to Pinterest
 These little pink spheres have earned a permanent spot in my dessert rotation, and I hope they do the same for you. They're proof that the best recipes don't need to be complicated—they just need to taste like celebration.
Questions & Answers
- → How far ahead can I make these truffles?
You can prepare the uncoated Oreo balls up to 3 days in advance, storing them tightly covered in the refrigerator. Once dipped in candy coating, they'll stay fresh for up to 1 week when kept in an airtight container in the refrigerator. The candy shell helps protect the creamy center from drying out.
- → Can I freeze these truffle balls?
Yes, these freeze beautifully both before and after coating. Freeze uncoated balls on a baking sheet until firm, then transfer to a freezer bag for up to 3 months. Thaw overnight in the refrigerator before dipping. Already-coated truffles can also be frozen for 2-3 months—layer them between wax paper in a container to prevent sticking.
- → Why is my candy coating too thick or clumpy?
Candy melts can become thick if overheated or if moisture gets into them. Try adding 1 teaspoon of vegetable shortening or coconut oil to thin the consistency. Avoid using water-based liquids as they'll cause seizing. Microwave in shorter intervals and stir thoroughly between each heating to prevent overheating.
- → Can I use white chocolate instead of candy melts?
White chocolate works but behaves differently than candy melts—it's softer when set and more sensitive to temperature. Candy melts are formulated specifically for coating and create a firmer shell. If using white chocolate, temper it properly for best results, and store the finished truffles in a cool place to prevent melting.
- → How do I get smooth, professional-looking truffles?
Ensure the Oreo balls are thoroughly chilled before dipping—cold centers create a better seal. Use a dipping fork or two-pronged fork to lower balls into the coating, tap gently against the bowl edge to remove excess, and slide onto parchment paper. Work quickly and don't let the coating get too cool. If it thickens, reheat briefly.
- → What other flavor variations can I try?
Mix in extract flavors like mint, almond, or orange with the cream cheese. Add chopped nuts, shredded coconut, or mini chocolate chips to the Oreo mixture. Use different cookie varieties like golden Oreos, vanilla wafers, or graham crackers. You can also fill the centers with caramel, peanut butter, or Nutella before coating.